Introduction
In this tutorial, I will show you how to open a 3D model in Photoshop for texturing, and the basic controls while in 3D Mode. All files I use in this tutorial will be available to download here.
|
Tools Required:
|
Recommended Tools:
|
Step 1 - Open the Model
Before you can open the model up in Photoshop, you need to make a new, blank canvas. Any size is fine, though I recommend a medium to large sized canvas. Keep in mind that if your canvas is too big, it may use a lot of RAM when you open the model. Once you blank canvas is open, go to the top bar and click '3D' then 'New 3D Layer from File...'

|
Navigate to where you have you model saved to and open it. Photoshop can only open models saved in a .obj format.
After a few seconds, your model should open. |

|
Navigation

1 - This is the top view and dimensions of the model.
2 - These buttons are how you will navigate around the model. To use them, click and drag.
3 - This is the 3D environment layers. This is where you adjust aspects of the environment, such as lighting.
4 - The properties window is where you adjust the values of the 3D environment, such as light intensity, light color, shadows, ect..
2 - These buttons are how you will navigate around the model. To use them, click and drag.
- Orbit : Moves you around the model (think of the solar system).
- Pan : Adjusts the current view.
- Dolly : Zoom in or zoom out.
3 - This is the 3D environment layers. This is where you adjust aspects of the environment, such as lighting.
4 - The properties window is where you adjust the values of the 3D environment, such as light intensity, light color, shadows, ect..
Step 2 - Editing the Lighting
|
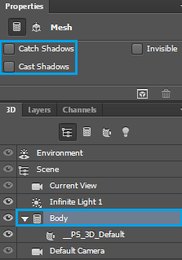
This step is optional, but personally, I find shadows and dim lighting are intrusive to texturing. First, lets remove the shadows. To do this, click 'Body' in the 3D panel, then uncheck 'Catch Shadows' and 'Cast Shadows' in the properties panel. Catch shadows allows the models to have shadows cast by other object, or self shadowing. Cast shadows is just the shadow the models casts.
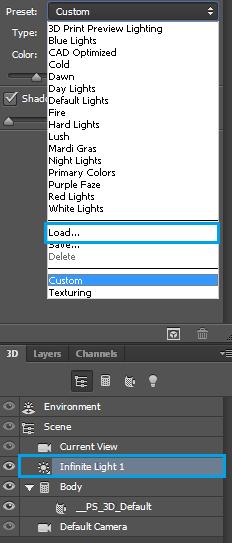
Next, click on 'Infinite Light 1'. This is the default lighting loaded when you open a model in Photoshop. For texturing, I like using a bright lighting environment. To load a new lighting environment, go to the properties panel and click the dropdown box next to Preset. You can choose from one of the default presets, load a preset, or save the current lighting environment to be used later. I have my own preset I use for texturing, which I have available for download. Click 'Load...', then select 'Texturing' lighting environment, then click load. The new lighting environment should load in a few seconds. TIP: If the lights seem too bright for you, in the properties panel for your material, turn 'Shine' and 'Roughness' up to 100%. (_PS_3D_Default is my material file) |
|
|
Step 3 - Prepare the Texture
All games use texture sizes that are in powers of two; 1x1, 2x2, 4x4, 8x8, 16x16, 32x32, 64x64, 128x128, 256x256, 512x512, 1024x1024, 2048x2048, and so on.Textures don't have to be square, though the dimensions must be a power of two. Most modern games use a mixture of 1k and 2k textures. Alicia Online uses 512x512 texture sizes for the horses. You can make the texture sizes bigger or smaller if you wish, but larger textures may cause lag for people with lower end computers, and smaller textures wont look good.
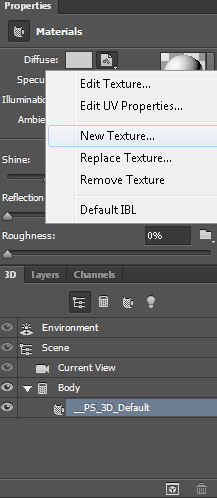
For this step, we need to make sure that Photoshop will be using the correct canvas size for our texture. To check this, click on your material file. It should be right below the Body layer. For me, it's called _PS_3D_Default. Once you have the material selected, go up to the properties panel and click the file icon next to 'Diffuse', then click 'New Texture...'.
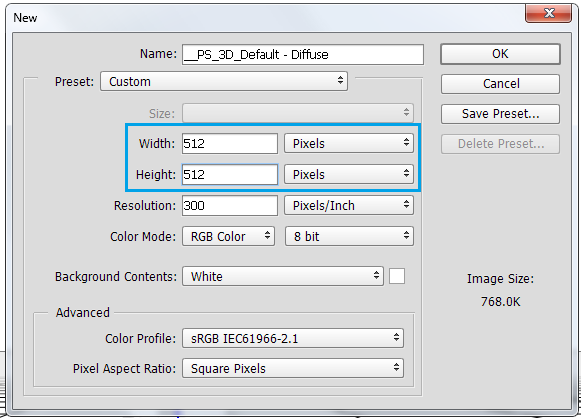
This will open a popup window. Here you will input what dimensions you want your texture to be. Make sure it is 512x512 pixels, then click ok.
Once your texture's dimensions are correct, click the file icon again and click 'Edit Texture...'. This will open the texture in a new tab, and you can start editing! If you want to color straight onto the model, simply go back to the tab the model is in, select the brush tool, and color.
For this step, we need to make sure that Photoshop will be using the correct canvas size for our texture. To check this, click on your material file. It should be right below the Body layer. For me, it's called _PS_3D_Default. Once you have the material selected, go up to the properties panel and click the file icon next to 'Diffuse', then click 'New Texture...'.
This will open a popup window. Here you will input what dimensions you want your texture to be. Make sure it is 512x512 pixels, then click ok.
Once your texture's dimensions are correct, click the file icon again and click 'Edit Texture...'. This will open the texture in a new tab, and you can start editing! If you want to color straight onto the model, simply go back to the tab the model is in, select the brush tool, and color.
|
|